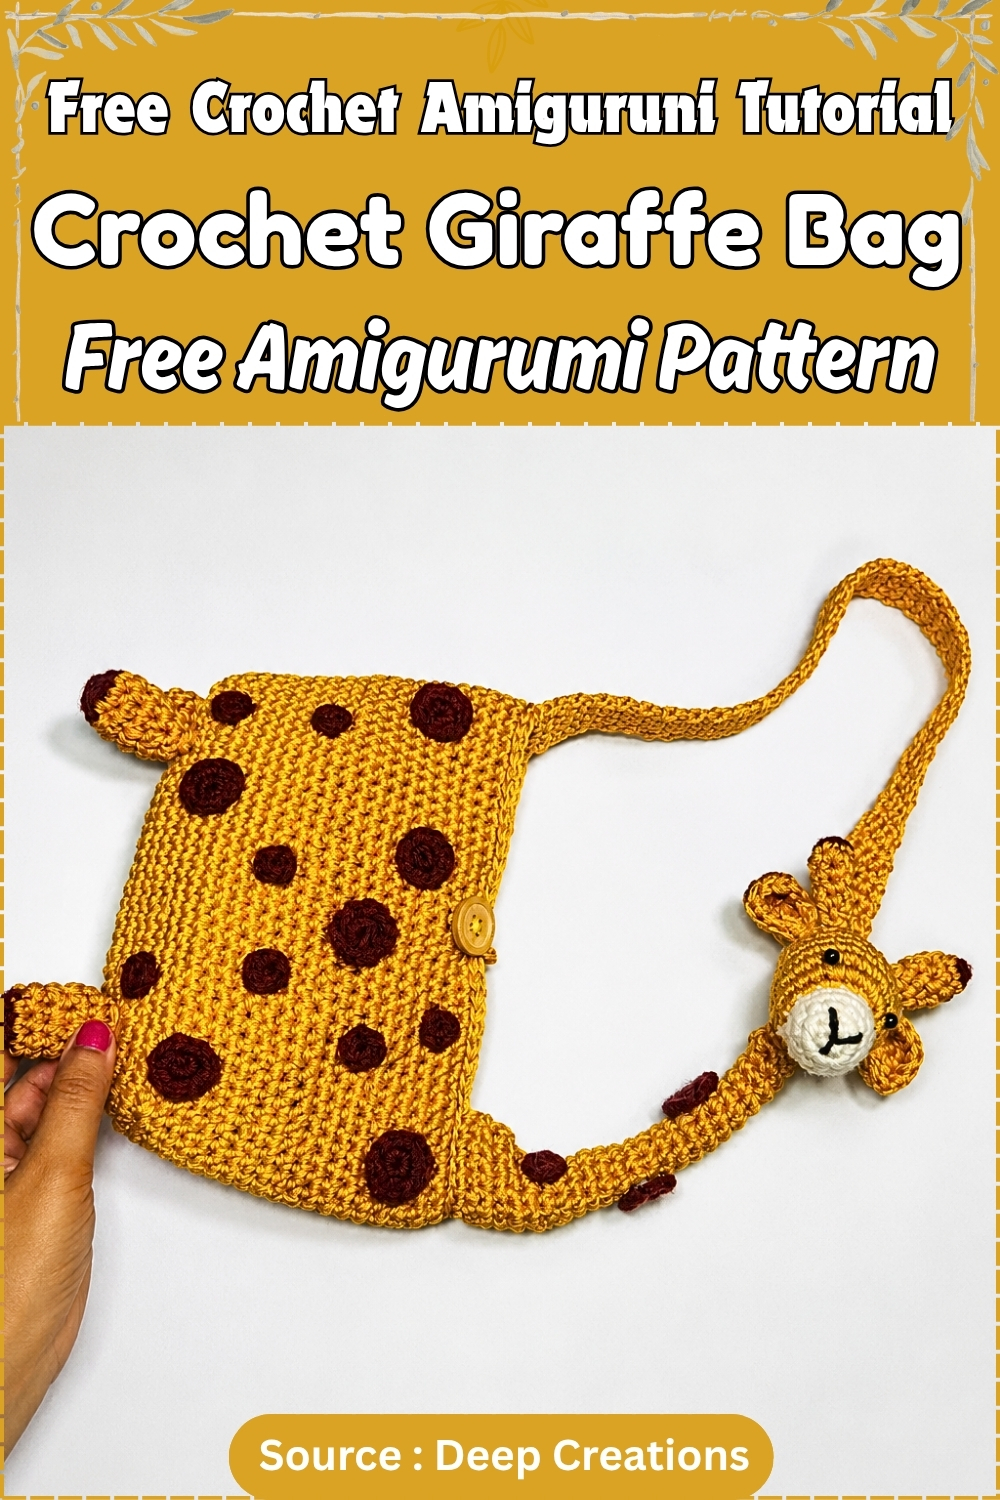
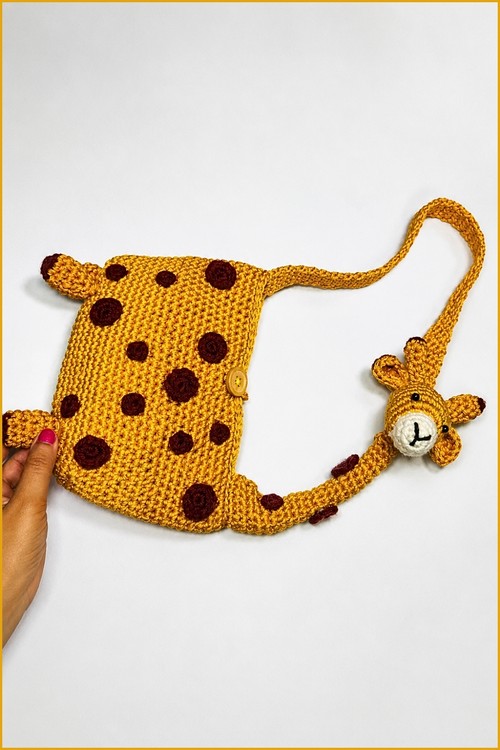
Giraffe loving kids can sling the crochet giraffe purse across the body to show off its deep brown spots and smiling white muzzle. Crayons, hair clips and pocket money fit inside the crochet giraffe bag, which hangs from a bedroom hook as playful decor between outings.
My neighbour’s daughter started school this autumn with a bag that kept sliding off her shoulder. So I made her a giraffe to carry instead, its little head riding just above her collarbone. Sturdy 2 mm macrame cotton keeps the oval body firm enough for a snack and a pencil case. Her favourite part turned out to be the horns, which she checks for wobbles every morning before leaving.
Crochet Giraffe Bag Free
Children between roughly 3 and 10 can wear the strap at the length written. Anyone with a few amigurumi projects behind them will find the stitches simple, though the head asks for some concentration.
Why I love this one: the neck grows straight out of the bag, so the giraffe rises from its own body with no seam to hide.
Materials and Tools
Amounts and sizes here are approximate, so adjust to what you have.
- 2 mm macrame or cotton thread in yellow, enough for the bag body, neck and head
- Small amount of white cotton thread for the muzzle
- Brown or black wool for the spots, horns and facial details
- 3.5 mm crochet hook for the bag body, neck and strap
- 3.0 mm crochet hook for the muzzle, head, horns, ears and legs
- Black pearl beads or safety beads for the eyes, or black embroidery thread for children under three
- Fiberfill or cotton stuffing
- One button for the closure
- Stitch markers
- Tapestry needle
- Measuring tape
- Scissors
The original puts the finished bag at roughly 18 cm tall with a strap of around 49 cm, sized for children of about 3 to 10. Both measurements are easy to adjust. Macrame thread varies a lot in tension from one maker to the next, so work a quick test swatch before you commit to the body rounds.
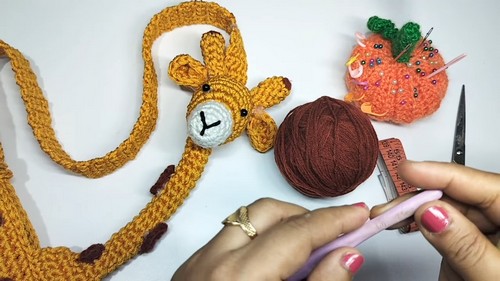
Pieces List
- Bag body: make 1, worked as an oval from the base up
- Giraffe neck: make 1, worked straight off the bag body and stuffed
- Muzzle: make 1, worked in white as the start of the head
- Head: make 1, worked outward from the muzzle
- Ears: make 2
- Horns: make 2, in brown and yellow
- Legs: make 4
- Spots: make as many as you like
- Strap: make 1, worked in flat rows from the side of the bag
That’s nine kinds of piece, plus however many spots you decide on. Legs and spots go quickly. The head needs the most focus, because the muzzle and head are one continuous piece with no seam between them.
Crochet Giraffe Bag Pattern
Bag Body
Use the 3.5 mm hook and yellow thread throughout.
- Foundation: Chain 21.
- Round 1: Skip the first chain and work 19 single crochet across the chain. Work 3 single crochet in the very last chain to turn the corner. Turn and work back along the other side of the foundation chain with 1 single crochet in each stitch across. Work 3 single crochet in the final stitch to close the oval, then join with a single crochet. Shape checkpoint: The piece should lie flat as a long, narrow oval, a bit like a surfboard, with the 3 stitch corners fanning out smoothly. If the corners cup upward, your tension is tight.
- Rounds 2 to 5: Keep working in rounds with a stitch marker at each curved end. At both ends, increase symmetrically by working 2 single crochet in each corner stitch so the oval widens evenly. Continue until 5 base rounds are complete. Shape checkpoint: By round 5 the oval should be clearly wider at both ends and still lying flat. Measure across both short ends. If one is wider, the increases have drifted out of balance.
- Round 6: Work 1 single crochet in each stitch around with no increases.
- Round 7: Work single crochet around, placing a few single crochet two together decreases symmetrically at the corners to draw the sides in slightly.
- Rounds 8 to 24: Work 1 single crochet in each stitch around with no increases or decreases until the bag body measures about 18 cm tall. Shape checkpoint: By round 15 or so you should have a clean upright tube on a flat oval base. Hold it up and check the sides run straight. Tapering or flaring means the stitch count has been creeping.
- Finishing round: Work a slip stitch in each stitch around. Fasten off and weave in the ends.
Don’t let crochet patterns intimidate you! If you’re a beginner, the video tutorial below makes it super easy to follow along!
Giraffe Neck
Use the 3.5 mm hook and yellow thread. The neck is worked directly off the top edge of the bag, so there’s no separate piece to attach later.
- Fold the bag flat so the sides line up.
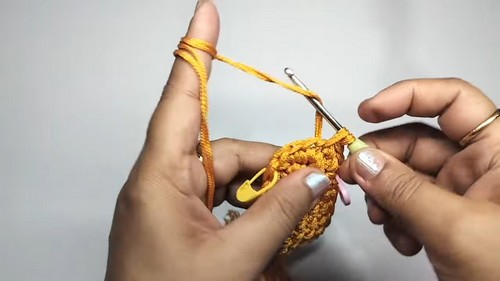
- Row 1: Attach yarn at one top corner and work 13 single crochet across the side section. Chain 1 and turn.
- Row 2: Work 13 single crochet across. Chain 1 and turn.
- Row 3: Work 13 single crochet across. Chain 1 and turn.
- Row 4: Decrease at the beginning and the end of the row. 11 stitches. Chain 1 and turn.
- Row 5: Decrease at both ends. 9 stitches. Shape checkpoint: The flat section should look like a short tab that narrows evenly on both sides toward the top.
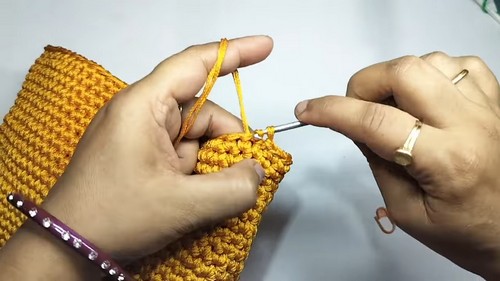
- Round 6 onward: Join the 9 stitches into a tube with a slip stitch. Work continuous rounds of 9 single crochet until the neck reaches the height you want, for a total of 23 rows counting the flat section. Stuff firmly with cotton as you go, adding fill a little at a time as the tube grows. Shape checkpoint: Where the rows become a tube you should see a slight angle as the neck narrows, and the tube should stand upright from the bag opening. If it leans, the stuffing is uneven, so push more to the inside of the lean before it settles.
Notes for the neck:
- Firm stuffing does real structural work here. The neck carries the head and anchors one end of the strap, so a soft neck sags.
- Add stuffing every few rounds instead of cramming it all in at the end.
- Keep the neck straight while you fill it. A curve can’t be corrected once the head is on.
Muzzle
Use the 3.0 mm hook with white thread held double. The head grows straight out of this piece.
- Round 1: Make a magic ring and work 6 single crochet into the ring. Join.
- Round 2: Work 2 single crochet in each stitch around. 12 stitches. Join.
- Rounds 3 to 5: Work 1 single crochet in each stitch around. 12 stitches in each round. Fasten off the white thread. Shape checkpoint: The muzzle should be a short, firm cylinder with a flat face and even walls, not a dome. If it cups, work the plain rounds a little looser.
Head
Switch to yellow thread and keep the 3.0 mm hook. Attach the yellow to the edge of the muzzle.
- Round 6: Work 1 single crochet, then 2 single crochet in the next stitch. Repeat around. 18 stitches.
- Round 7: Work 5 single crochet, then 2 single crochet in each of the next 5 stitches, then 8 single crochet. 23 stitches. Shape checkpoint: You should see a small forehead shelf where the 5 back to back increases landed. The face will look rounder than you expect at this point, and that’s normal.
- Rounds 8 to 12: Work 1 single crochet in each stitch around. 23 stitches in each round. Shape checkpoint: By round 12 the head should look like an egg with a snout attached at one end.
- Decrease rounds: Taper the head closed gradually with single crochet two together decreases worked through the front loops only, over consecutive rounds. Stuff the head completely before the opening gets too small to reach inside, then close it tightly.
Ears
Make 2 in yellow thread with the 3.0 mm hook.
- Round 1: Make a magic ring and work 6 single crochet into the ring.
- Round 2: Work 2 single crochet in each stitch around. 12 stitches.
- Round 3: Work 1 single crochet in each stitch around. 12 stitches. Fasten off, leaving a tail for sewing. Shape checkpoint: Pressed flat, each ear should be a small oval a little bigger than a large coin, and both should match. If one puffs up, the magic ring was pulled too tight.
Horns
Make 2 with the 3.0 mm hook.
- Using brown wool, make a magic ring and work 6 single crochet into it.
- Switch to yellow thread and work 4 to 5 rounds of 6 single crochet to form the post.
- Fasten off, leaving a tail for sewing. The horns are not stuffed. Shape checkpoint: Each horn should be a slim post topped with a brown knob. Make sure both have the same number of yellow rounds so they stand at matching heights.
Legs
Make 4 with the 3.0 mm hook.
- Start with brown wool.
- Chain 2 and work 5 single crochet into the first chain. 5 stitches.
- Round 2: Work 2 single crochet in each stitch around. 10 stitches.
- Switch to yellow thread.
- Work 3 rounds of 10 single crochet.
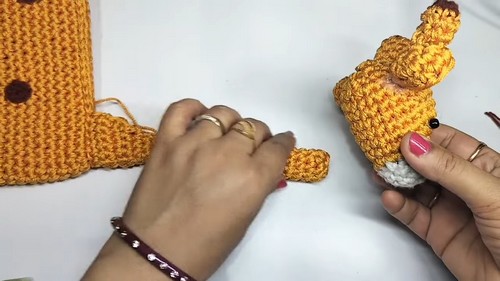
- Decrease slightly on the top round. Fasten off, leaving a tail for sewing. Shape checkpoint: Each leg should be a stubby little cylinder, wider at the brown hoof and very slightly tapered at the top. Stand all four side by side and check they match in height before sewing.
Spots
- Using brown wool and the 3.0 mm hook, crochet small flat circles of 6 single crochet or 12 single crochet.
- Make as many as you like.
- Pin them across the bag body before sewing anything permanently. Step back and look. Spots set out in a neat grid look odd on a giraffe, so vary the gaps and let a few cluster.
Strap
Use yellow thread and the 3.5 mm hook.
- Find the top corner of the bag on the side opposite the neck.
- Attach the yellow thread across a span of 4 stitches.
- Work rows of 4 single crochet back and forth until the strap measures about 49 cm, or the length you want.
- Secure the free end of the strap to the base of the giraffe’s head, where it meets the top of the neck.
Eye Timing
This pattern uses sewn bead eyes, which go on after the head has been fully made and stuffed. Stitch them just above the round 7 increases on the muzzle side of the head. Because they’re sewn through finished fabric rather than pushed through the wall, any time before final assembly works.
Safety beads with posts and washers are different. If you swap to those, fit them during rounds 8 to 12, before you start the decrease rounds and before any stuffing goes in, because you won’t be able to reach the washers once the head closes. For any child under three, skip the beads completely and embroider the eyes in black thread with satin stitch in the same spot. No exceptions.
Assembly
Order matters more than usual here, because several pieces share anchor points. Pin everything before you sew it.
- Spots onto the bag body. Do these first, while the bag is still bare and easy to lay flat.
- Ears and horns onto the head. Sew an ear to each side of the upper head, then place the horns between them. Pin both sides first so everything sits at the same height.
- Eyes. Stitch the beads, or embroider the eyes, just above the muzzle increases while the head is still loose in your hand.
- Nose. Embroider a small V in black thread at the centre of the white muzzle.
- Head onto neck. Turn the head so it faces forward, then stitch securely through the base of the head and the top of the neck. The neck stuffing should push back against the needle. That resistance is what keeps the head steady over time.
- Legs onto the bag base. Place one at each corner of the oval base, where the curved ends meet the long sides, spaced evenly. Check all four stand flat on a table before sewing, then go around each leg top twice into the base fabric.
- Strap. It runs from the bag side up to the base of the head, as worked in the pattern.
- Button. Sew it to the bag rim on the side opposite the neck.
Stuffing Guide
- The neck comes first. Pack it denser than looks right, firm enough to hold upright under the weight of the head. Small children also tend to carry this bag by the neck instead of the strap, which is one more reason to fill it hard.
- Stuff the head fully and evenly, with no soft patches or dents when you press the sides. The muzzle takes a lighter touch so it stays rounded without bulging out of shape. Legs, ears, horns and spots stay unstuffed. Overfilling the head stretches the front loop decreases, and you’ll spot it as gaps opening along the closing seam.
Toy Safety
- For a child under three, use embroidered eyes. Sewn beads are still a swallowing hazard for toddlers, because fabric wears and stitches loosen with daily use. Check the ears, horns and legs regularly if the bag sees heavy play.
- The button deserves the same attention. A large shank button sewn through a small backing button or washer on the inside holds much better than one stitched through the fabric alone. Keep the long strap away from cots and car seats when the bag isn’t being worn.
Yarn Substitution and Size Scaling
- The 2 mm cotton or macrame thread on a 3.5 mm hook is a deliberate pairing. It makes a firm, structured fabric, which a bag needs if it’s going to keep its shape with something inside. Standard DK cotton on the same hook will give you softer fabric, and the oval base may slump.
- Moving up to a 4 mm hook with 4 mm cotton cord gives a larger bag that still holds its structure and works up faster. The 9 stitch neck will look chunkier next to the head at that size, though. If you scale up, you might add 2 or 3 extra stitches to the neck at the join to keep the proportions, which is a change from the original and not part of the pattern as written.
FAQ
- What age is this bag good for? The strap as written suits children of roughly 3 to 10. For anyone younger, embroider the eyes and check the sewn parts often. Older kids and adults just need a longer strap.
- Why is my neck leaning to one side? It’s nearly always uneven stuffing in the lower half of the tube. Pull some fill out and repack it evenly if the head isn’t on yet. If it is, a rolled strip of craft foam pushed down the centre can straighten it, and it’s safer for a child than anything with wire in it.
- Can I use regular yarn instead of macrame thread? Cotton DK or sport weight comes closest, though the bag will be softer and won’t hold its shape as firmly. Skip anything stretchy like acrylic, or you’ll end up with a floppy bag that sags as soon as you put something inside it.
- Can I skip the spots? Yes, they’re just sewn on top and don’t hold anything together. A plain yellow bag looks clean too, especially with a contrast colour on the muzzle or ears.