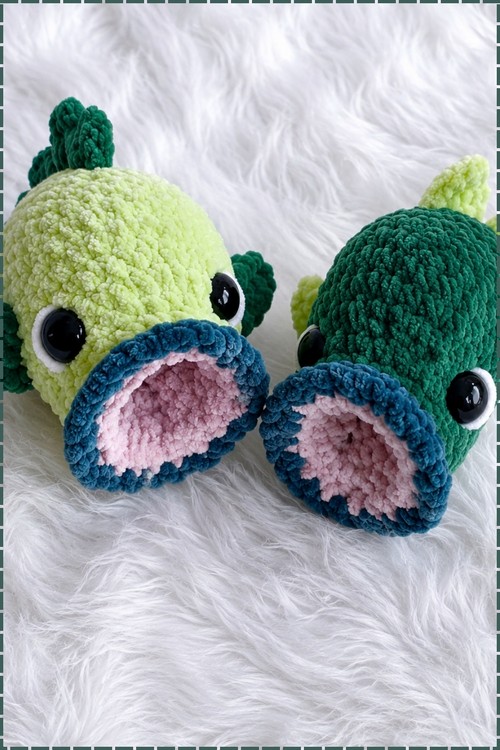
Anglers get a soft desk buddy in the crochet plush bass, whose spiky top fin and round belly give it the look of a fish fresh off the line. Kids can sit the chubby bass plushie on a nursery shelf, a cabin bunk or a toy basket beside their other water animals.
Fish amigurumi with open mouths are a construction challenge that most patterns avoid, but this crochet plush bass builds the gaping mouth directly into the body shape using a separate inner piece crocheted in pink and edged in teal. The chenille yarn gives both the light and dark green colorways a texture that reads more like actual fish skin than standard amigurumi yarn would allow. Large black safety eyes placed just above the open mouth complete the exaggerated, wide-mouthed expression that makes bass so recognizable.
Crochet Plush Bass
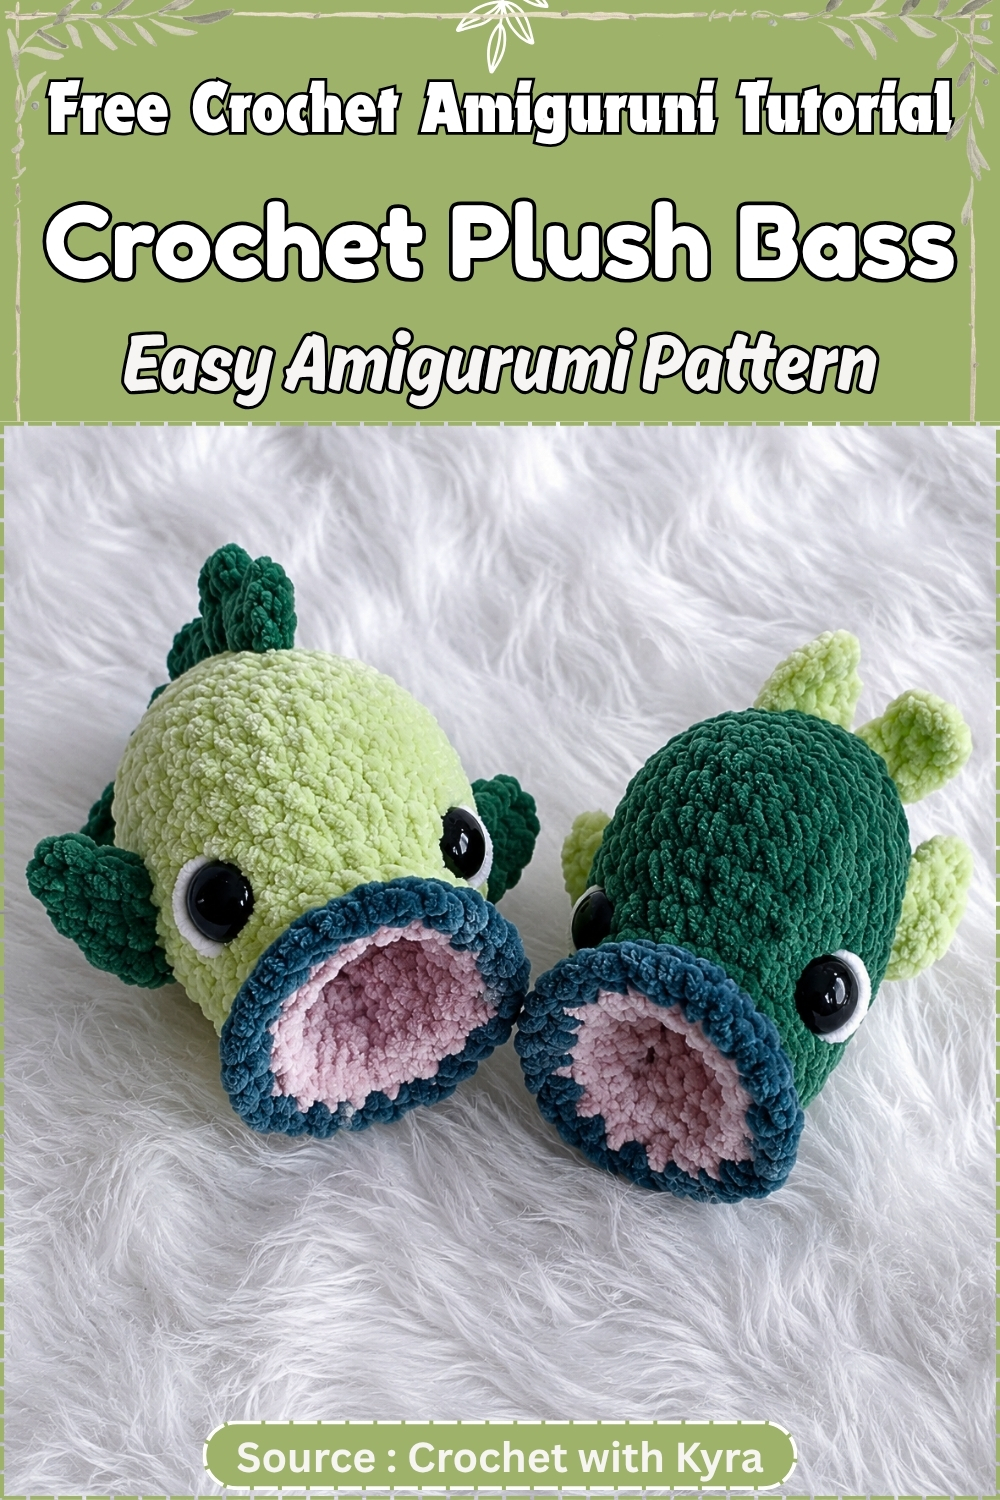
Plush bass uses Premier Parfait Chunky chenille yarn, which is why the finished fish reads as soft and velvety rather than like standard amigurumi. Chenille hides tension variations completely. Side fins attach during crocheting rather than afterward, and the inner mouth construction is the technique that makes this fish look like a fish rather than a generic plush shape. Make it in two colourways side by side and the same pattern produces two completely different personalities.
Finished size: approximately 20 to 25 cm long at chunky weight. Difficulty: intermediate. Estimated time: 3 to 5 hours. Piece count: 6 (mouth, body, 2 side fins, tail, top fin, lips).
Colour and Customisation Ideas
The pink mouth and lips are part of the fish’s silhouette, so swapping them to white makes the whole piece read cooler and more realistic. Swap the light green body for a blue or slate grey and the bass reads saltwater rather than freshwater. Dark green for the top fin can go to teal or charcoal without changing anything else. For a bolder version, try a warm gold body with a cream mouth and a dark brown top fin. The white eye highlight is a small detail that does a lot of visual work — keep it regardless of what else you change.
Quick Facts
- Finished size: approximately 20 to 25 cm at chunky weight
- Difficulty: intermediate
- Estimated time: 3 to 5 hours
- Piece count: 6 pieces plus lips and eye highlights
- Hook: 5 mm
- Yarn: Premier Parfait Chunky in pink, light green, dark green, plus white for highlights
Pieces List
- Mouth (pink): make 1
- Body (light green): worked directly from the mouth, make 1
- Side fins: make 2
- Tail: worked directly from the closed body
- Top fin (dark green): surface crocheted onto the finished body
- Lips (pink): worked into the front loops left open on the mouth
Make both fins before starting the body. Everything else follows in order.
Materials and Tools
- Premier Parfait Chunky yarn in pink
- Premier Parfait Chunky yarn in light green
- Premier Parfait Chunky yarn in dark green
- Small amount of white yarn for eye highlights
- 5 mm crochet hook
- 20 mm safety eyes
- Polyfill stuffing
- Stitch marker
- Embroidery needle
- Scissors
Parfait Chunky is a chenille-style yarn. Individual stitches do not show clearly on the surface, which works in a beginner’s favour for tension, but makes counting mid-round harder than usual. Your stitch marker matters more on this yarn than it would on standard acrylic.
Safety Eye Timing
The 20 mm eyes go in between Rounds 13 and 14 of the body, while the opening is still large enough to reach inside and press the washers. Position them approximately 8 stitches apart and hold the fish at eye level from the front before locking them in. Washers cannot be removed without cutting the post.
For any toy going to a child under three, embroider the eyes with black yarn after the fish is finished. Safety eye hardware is a choking hazard at that age.
Beginner Technique Notes
The magic ring is just an adjustable starting loop. Wrap yarn around two fingers, insert the hook through the loop, pull up a new loop, chain 1 to anchor, then work your first round into the loop. Pull the tail to close the centre. If it slips when you pull, try wrapping twice before inserting the hook.
Continuous rounds mean crocheting in a spiral with no slip stitch at the end of each round. Move your stitch marker into the first stitch of each new round as you go. When you return to the marker, the round is done.
FLO and BLO mean front loop only and back loop only. Hold your work facing you: the loop closest to you is the front loop, the one sitting behind it is the back loop. Working into one loop leaves the other free, which creates a ridge and an attachment point for later rounds.
The invisible decrease gives cleaner results than a standard sc2tog. Insert the hook into the front loop only of the next stitch, then into the front loop only of the stitch after it, pull one loop through both, yarn over and pull through both loops on the hook. It counts as one stitch but uses two.
Tips
- Use a stitch marker on every round. Chenille swallows stitch boundaries.
- When working the mouth inversion, flip it slowly and check the fabric is sitting the right way before continuing. The right side of the fabric should now face inward.
- Keep stuffing behind the mouth cavity. Fiberfill packed into the mouth opening will push it closed and flatten the fish’s expression.
The Pattern
Mouth (Pink)
- The mouth is made first, turned inside out, and the body builds from it.
- Round 1: Work 6 sc into a magic ring. (6)
- Round 2: Work 1 inc in each stitch around. (12)
- Round 3: Work (1 sc, 1 inc) × 6. (18)
- Round 4: 18 sc. (18)
- Round 5: 18 sc. (18)
- Round 6: 18 sc. (18)
- Round 7: 18 sc. (18)
- Round 8: 18 sc. (18)
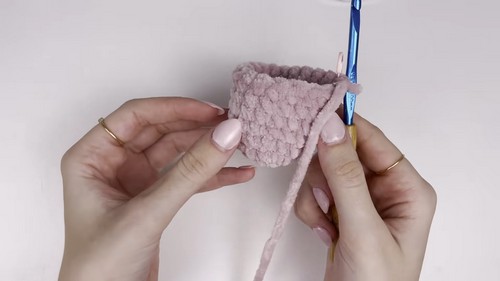
- Round 9: Work 18 sc in front loops only. (18) Checkpoint: after slip stitching to finish this round and fastening off, the piece should be a wide open cup with flat base and upright walls; if the purl bumps are on the outside it has not been turned yet.
- Slip stitch to finish the round.
- Fasten off.
- Turn the mouth inside out so the right side of the fabric now faces inward and the bumpy side faces into the body. This is correct.
Fins (Make 2)
- Read through all steps before starting.
- Round 1: Work 6 sc into a magic ring. (6)
- Chain 2.
- Turn the work.
- Work 4 dc into the third stitch from the hook.
- Chain 2.
- Slip stitch into the same stitch.
- Fasten off. Checkpoint: each fin should be a small fan shape, a cluster of double crochets with a slight flare; make both before starting the body and set them aside.
Body (Light Green)
- Attach light green yarn to the back loops remaining from Round 9 of the mouth.
- Round 1: Work 18 sc into those back loops. (18)
- Round 2: 18 sc. (18)
- Round 3: 7 sc, 3 inc, 8 sc. (21)
- Round 4: 7 sc, (1 sc, 1 inc) × 3, 8 sc. (24)
- Round 5: 7 sc, (2 sc, 1 inc) × 3, 8 sc. (27)
- Round 6: 27 sc. (27)
- Round 7: 27 sc. (27) Checkpoint: the green section should be noticeably wider on one side than the other, because all three increase groups in Rounds 3 to 5 land in the same area; that asymmetry is intentional and forms the top of the fish’s body.
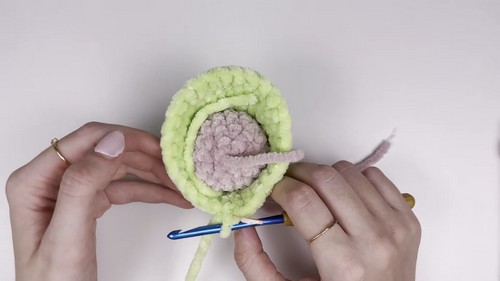
- Flip the green body section over and down over the pink mouth so the mouth sits inside the body, facing outward through the front opening. The green fabric wraps around it.
- Round 8 (Fin Attachment Round): Work around the body. At each fin placement point on the sides, crochet through both the body stitch and the corresponding fin stitch at the same time to join the fin as you go. No sewing required.
- Safety eyes: insert the 20 mm eyes between Rounds 13 and 14, approximately 8 stitches apart, before the opening narrows too far. Press washers firmly from inside.
- Continue working decrease rounds to close the body gradually. The pattern states “continue decrease rounds as needed” without providing specific round counts. A reliable structure is (sc, dec) repeated around until the opening is small enough to close with 4 sc through both sides for the tail base.
- Continue stuffing as you decrease. Keep fiberfill behind the mouth section, not pushed into the mouth cavity.
- Pattern note: the body decrease round instructions are not specified in the source. Work standard amigurumi decreases until 8 stitches remain.
- Checkpoint before closing: hold the fish upright and view it from the front; the pink mouth should be centred and both eyes should sit level; an eye that reads higher than the other means the stuffing underneath has compressed unevenly.
Tail
- Close the body by working 4 sc through both sides of the remaining opening simultaneously, seaming the gap shut.
- Tail Row 1: Chain 1, turn. Work 4 inc. (8)
- Tail Row 2: Chain 1, turn. Work 8 sc. (8)
- Tail Row 3: Alternate groups of 3 dc with decreases across the row to create the tail fan shape.
- Fasten off and weave in the end. Checkpoint: the tail should fan outward from the narrow seam, wider at the tips than at the base; if it lies flat and rectangular the dc groups have been distributed evenly across the row instead of placed at the ends.
Top Fin (Dark Green)
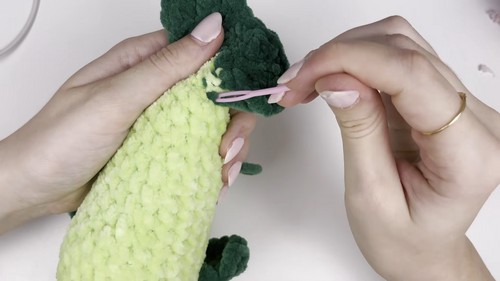
- Attach dark green yarn to the top of the body using surface crochet: insert the hook through the fabric from front to back, pull up a loop of new yarn, then work along the surface.
- Form the fin texture using hdc and dc stitches, working toward the tail.
- Continue to the tail end.
- Fasten off and weave in the end.
Eye Highlights
- Thread a small length of white yarn onto the embroidery needle.
- Stitch a small white highlight dot onto each safety eye, anchoring it through the fabric on either side.
If you’re still learning how to read crochet patterns, no stress! Follow the video tutorial below and use the written pattern below as you get more comfortable!
Lips (Pink)
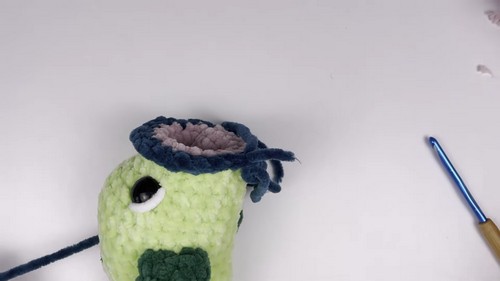
- Attach pink yarn to the front loop only stitches remaining around the mouth opening (the loops left free in Round 9 of the mouth).
- Work (1 sc, 1 inc) × 9 around. (27)
- Fasten off and weave in the end. Checkpoint: the lips should ruffle outward slightly from the mouth opening; if they pull inward the increases were worked too tightly.
Stuffing Guide
Fill the body moderately firm. The fish should hold its shape upright on its belly without the fabric feeling stretched. Keep stuffing entirely behind the mouth — nothing goes into the mouth cavity itself, or the open expression flattens. Tail and fins are unstuffed; their shape comes from the stitch structure alone.
Assembly
Fins and top fin attach during crocheting, not in a separate sewing session. After construction, the only additions are the eye highlights and the lip rounds, both worked into the finished body. There is genuinely nothing to hand-sew on this project.
Before finishing, run a finger along the surface crochet attachment line of the top fin. On chenille yarn, a loose loop is invisible until it is tugged. Better to find it now than after gifting.
Toy Safety
Safety eyes are not suitable for children under three. Embroider with black yarn instead. Weave all ends in securely. Chenille can pill and pull with heavy play, so check the seam between the mouth and body periodically on a toy that gets handled often.
FAQ
I have never worked FLO or BLO before. How do I tell which loop is which? Face your work toward you and find the two loops sitting on top of each stitch. The one closest to you is the front loop. On chunky chenille they sit close together, so a good lamp makes a real difference.
Why does the mouth get turned inside out before joining the body? The smoother face of the fabric ends up visible on the inside of the mouth, which is what you see looking at the fish head-on. It feels odd the first time but makes sense immediately once flipped.
My stitch count keeps going wrong in Round 3 of the body. What is happening? Round 3 places three increases back to back in a row, not spread across the round. Work 7 sc, then three increases one after another, then 8 sc. Distributing them produces the wrong count and the wrong shape.
Can I use a different chunky yarn? Any chunky yarn at the same weight will work with a 5 mm hook. Without chenille the fish will look more like standard amigurumi and less plush, which is a style choice rather than a mistake.