Bedrooms take a large crochet shark better than another teddy on the shelf. Worked big enough to hold like a pillow, and the gill lines go on as surface stitches after the body is finished.
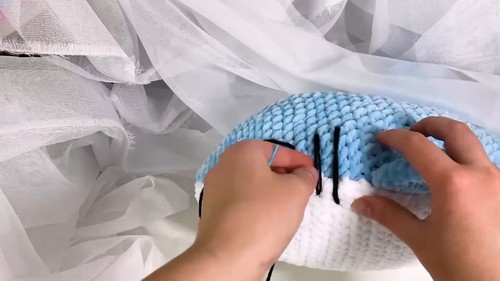
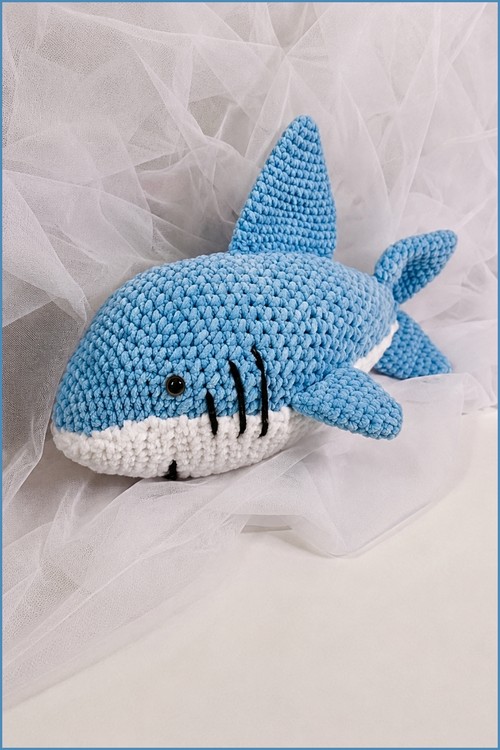
Black surface stitches mark five gill lines along each side of this large crochet shark pattern, worked in blue above and white below with the colour change running the full body length. The dorsal fin, tail, side fins and belly fin attach as separate pieces, and a single black safety eye sits on each side of the pointed snout. Stuff the tail firmly, since a soft tail droops and pulls the whole body out of line.
Large Crochet Shark
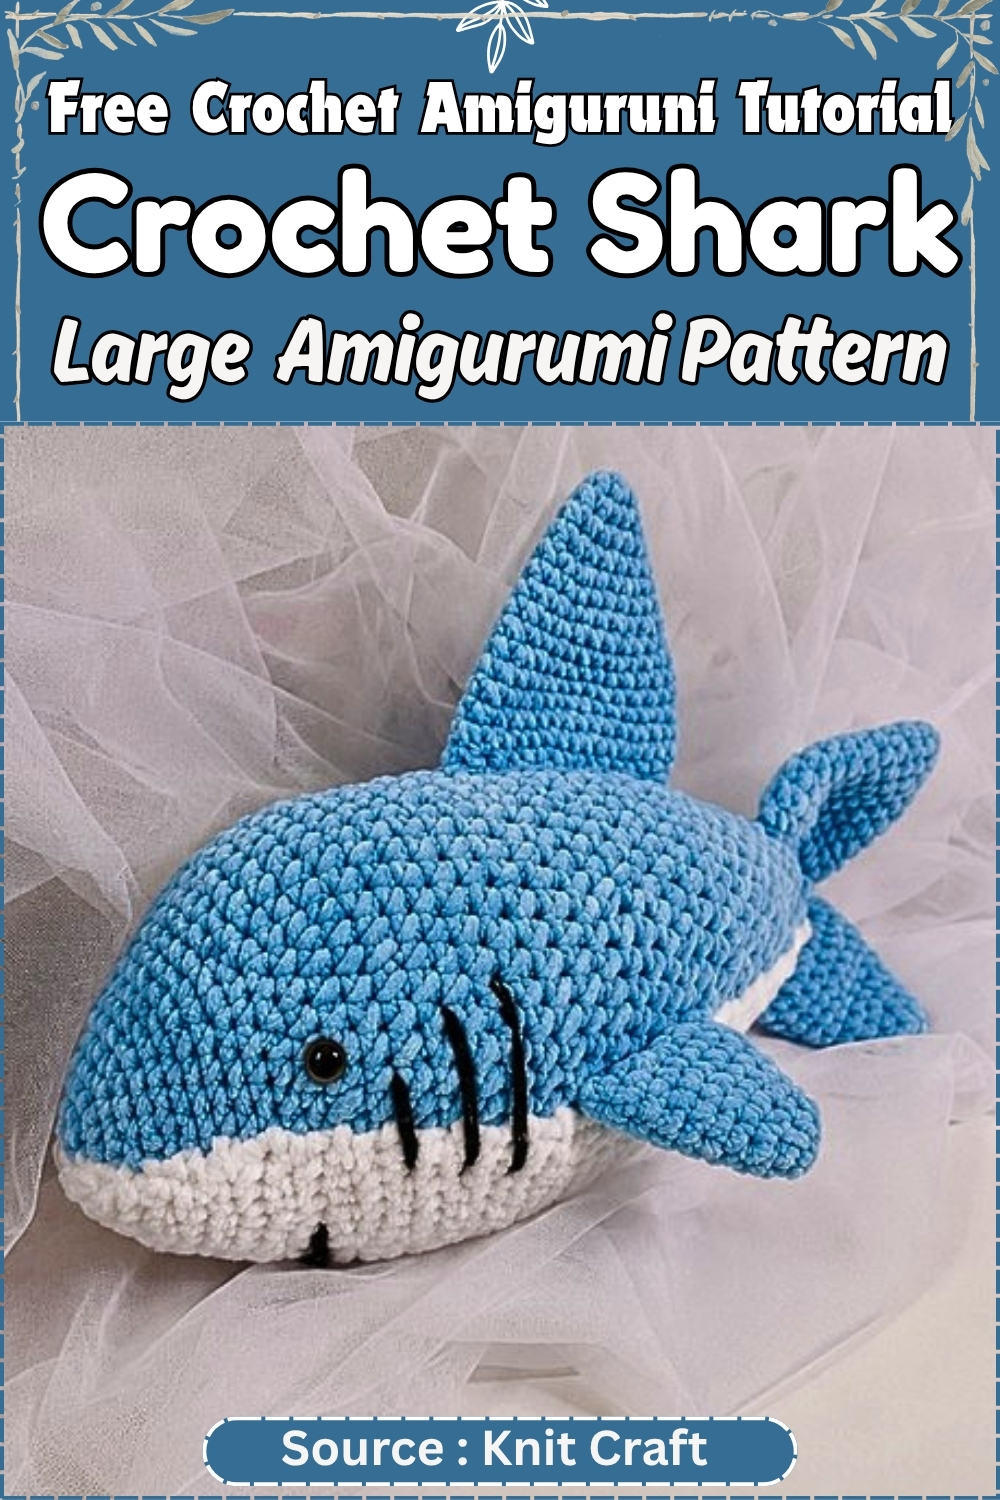
Bulky velvet yarn changes how a crochet shark amigurumi feels and looks — the plush texture adds weight and softness that makes this large crochet shark pattern especially satisfying to finish. The body is wide and rounded rather than sleek, giving it a toy-like quality that works well for kids while still looking detailed enough for display. Black embroidered gill lines and a contrasting white belly are the two details that pull the whole design together.
Pieces List
Before you start, here’s everything you’ll make:
- Main body — 1 piece (worked nose to tail, continuous rounds)
- Dorsal fin — 1 piece
- Pectoral fins — 2 pieces
- Tail fins — 2 pieces
Total pieces: 6 (5 fins + 1 body)
Complete all five fins first. They’re quick, identical in construction, and having them ready makes assembly much smoother.
Materials & Tools
Yarn
- Plush or velvet yarn in blue (or your chosen shark body color) — main color
- Plush or velvet yarn in white — for the belly section
Hook
- 4mm–5mm crochet hook, sized to suit your plush yarn. Check your yarn label; velvet yarn can vary.
Other supplies
- Safety eyes (size depends on your finished gauge — 9mm to 12mm is typical for this scale)
- Polyester fiberfill stuffing
- Yarn needle
- Scissors
- Stitch marker (highly recommended with plush yarn)
Approximate finished size: 25–35cm / 10–14 inches depending on yarn weight and tension. Plush yarn varies considerably between brands, so treat this as a range.
Approximate time: 4–7 hours across all pieces, including assembly.
Difficulty: Intermediate beginner. Requires color change and multi-piece assembly but no advanced shaping.
Abbreviations
- sc — single crochet
- inc — increase (2 sc in the same stitch)
- dec — decrease (2 stitches worked together as one)
- st / sts — stitch / stitches
- mr — magic ring
Beginner Notes Worth Reading First
- Magic ring: Make a loop with your yarn, insert the hook through the center, pull up a loop, chain 1, then work your first round of sc into the center of the ring. Pull the tail snug. This closes the center hole neatly.
- Continuous rounds: This pattern is worked in a spiral — no slip stitch, no chain at the end of each round. Place a stitch marker in the first stitch of each round and move it up as you go. With plush yarn especially, you’ll lose your place without it.
- Counting stitches: Plush yarn hides stitches. After every increase round on the body, stop and count before moving on. A missed increase in round 8 can cascade into a misshapen head by round 15.
- Invisible decrease: Standard decrease works fine, but an invisible decrease (insert hook through the front loop only of two consecutive stitches) looks cleaner in finished work. Either method is acceptable here.
The Pattern
Fins — Make 5 Total
(1 dorsal fin, 2 pectoral fins, 2 tail fins — all built from the same instructions)
Use blue yarn throughout. Do not stuff the fins.
- Round 1: Mr, 4 sc into the ring. (4 sts)
- Round 2: Inc in every st around. (8 sts)
- Round 3: [1 sc, 1 inc] repeat around. (12 sts)
- Round 4: [2 sc, 1 inc] repeat around. (16 sts)
- Round 5: [3 sc, 1 inc] repeat around. (20 sts)
- Rounds 6–7: Sc in each st around. (20 sts)
- Fasten off, leaving a long tail for sewing. Keep fins flat.
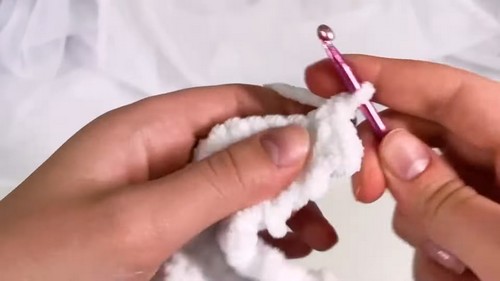
Shape checkpoints:
- After Round 2: A tiny flat circle, 8 sts. Should sit completely flat on your work surface.
- After Round 5: A wider flat disc, soft triangular suggestion starting to show at the edges.
- After Rounds 6–7: The fin should lie flat without curling. If it’s cupping or buckling, your tension may be tight — try a half-size larger hook.
Don’t let crochet patterns intimidate you! If you’re a beginner, the video tutorial below makes it super easy to follow along!
Fin notes: The repeated increases build a soft triangular shape without shaping rows. Keeping them flat is what makes them attach cleanly — a stuffed fin will bulge and look awkward on the body. The dorsal fin will sit upright on the shark’s back; the pectoral fins angle slightly downward from the sides; the tail fins point outward from the back seam.
Main Body and Head
Worked nose-first in continuous rounds. Blue yarn to start.
- Round 1: Mr, 4 sc into the ring. (4 sts)
- Round 2: Sc in each st around. (4 sts)
- Round 3: Inc in every st around. (8 sts)
- Round 4: [1 sc, 1 inc] repeat around. (12 sts)
- Round 5: [2 sc, 1 inc] repeat around. (16 sts)
- Round 6: [3 sc, 1 inc] repeat around. (20 sts)
- Round 7: Sc in each st around. (20 sts)
- Round 8: [4 sc, 1 inc] repeat around. (24 sts)
- Round 9: [5 sc, 1 inc] repeat around. (28 sts)
- Round 10: [6 sc, 1 inc] repeat around. (32 sts)
- Rounds 11–20: Sc in each st around. (32 sts each round)
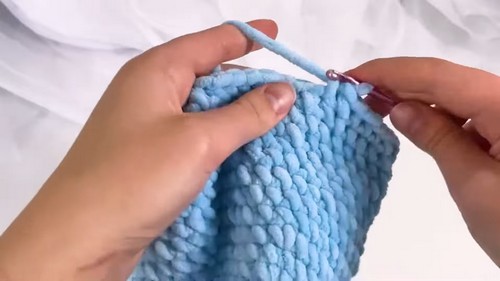
Shape checkpoints:
- After Round 3: A small flat 8-st circle — the closed nose tip.
- After Round 6: The piece should be rounding into a shallow dome, 20 sts. Not flat, not pointed. If it looks like a flat disc, your magic ring tension may be loose.
- After Round 10: A clear rounded head shape, 32 sts across. Hold it up — the nose should be distinctly rounder than the open end.
- After Round 20: A solid tube with a round closed end. This is the full body length before tapering. The center should feel straight and even.
Safety Eye Placement
Insert eyes before Round 21. Once you begin tapering and closing the body, the inside becomes inaccessible for washers.
Position safety eyes between Rounds 7 and 9 on either side of the head. Set them slightly wider apart for a cartoon-friendly look. Before locking the washers:
- Step back and check symmetry from the front
- Confirm both eyes sit in the same round
- Eyes placed too high on the head will flatten the face visually
For toys going to children under 3: Skip safety eyes entirely. After stuffing and closing, embroider eyes using black yarn with a few satin stitches. Embroidered eyes have no parts to detach.
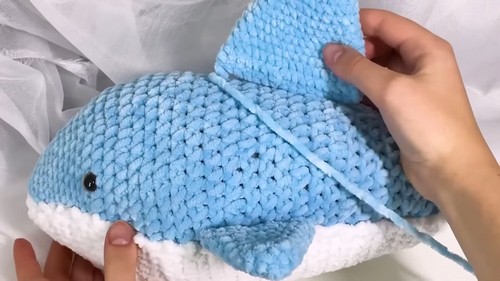
White Belly and Body Taper
The color change happens across the underside of the shark, beginning after Round 20.
- Attach white yarn across roughly half of the stitches on the bottom side of the body.
- Rows 21–28: Work the top stitches in blue, the bottom stitches in white, alternating as you move around.
- Begin decreasing in the back half of these rounds: work [4 sc, 1 dec] and then [3 sc, 1 dec] rounds to taper toward the tail.
- Fill the body firmly with fiberfill before the opening becomes too small to stuff.
Color change tips:
- Change colors on the final yarn over of the stitch before the color switch for cleaner joins.
- Carry the unused yarn inside the body rather than cutting and rejoining — fewer ends, neater finish.
- Keep the white centered underneath. It’s easy to drift; check alignment every couple of rounds.
Stuffing Guide
Fill in small handfuls rather than pushing in one large wad. Lumps from compressed clumping are almost impossible to smooth out through plush yarn.
- Nose: Slightly overstuff. The shark should hold its rounded front shape without pressure — if it flattens when you set it down, add more.
- Center body: Firm but not rigid. You want it to hold the tube shape.
- Near the tail opening: Ease off. You need room to sew the tail closed cleanly, and overstuffing here makes the final seam pull and pucker.
- Massage the stuffing through the fabric with your fingers as you go. Plush yarn is forgiving and you can redistribute a lot just by gentle pressure.
Assembly
Sew in this order:
- Tail fins first. When closing the final round of the body, sew it shut while capturing both tail fins directly into the back edge seam. Position them angling slightly outward from center.
- Dorsal fin. Sew centered along the top spine of the shark, upright. Pin it before sewing. Aim for the midpoint of the body length.
- Pectoral fins. Attach one on each side, low on the body near where the blue meets the white belly. Pin both in place and check they’re even before committing with stitches.
Use small, tight stitches throughout. Fins on a toy take handling pressure — a loose attachment will work free quickly. Pinning everything before sewing a single stitch is worth the extra two minutes.
Optional detail: Use a short strand of black yarn to stitch a curved smile and gill lines onto the face. Keep the stitches shallow — you’re embroidering on plush, not pulling tight.
Troubleshooting
- The body is curling or twisting. Count your stitches at the end of the current round before going further. Plush yarn buries missed increases, and a twisted body almost always traces back to an off-count somewhere in Rounds 8–10.
- My fin keeps cupping instead of laying flat. Tension is too tight. Go up half a hook size for the fins, or consciously loosen your grip. Fins should be relaxed and flat.
- The color change on the belly looks messy. Make sure you’re switching color on the yarn over of the previous stitch — one stitch early, not one stitch late. Carrying both yarns inside helps keep the tension consistent across the color boundary.
- The safety eyes look uneven once the washers are locked. Unfortunately they can’t be repositioned after locking. Prevention: use a pin or a piece of tape to hold each eye in place and look at the head from the front before you press the washer home.
- The nose went flat during stuffing. Pull a little fiberfill back out, redistribute it in smaller pieces directly into the nose tip, and close the opening slightly with your fingers while massaging. Slightly overstuffing the nose from the start is easier than fixing it after.
- The seam where I closed the tail is visible. Work the closing stitches through both layers using a mattress stitch with yarn that matches the blue. Weave the tail end deep into the body before trimming.
Yarn Substitution and Size Scaling
This pattern is written for plush or velvet yarn — the nap texture hides stitch definition, which is actually an advantage for amigurumi since it gives a smoother toy-like finish. If you substitute a standard worsted weight, the shark will be noticeably smaller (roughly 60–70% of the plush version) and the stitches will show more clearly, which some makers prefer.
To scale up: go to super bulky plush yarn with a 6mm–7mm hook. The fin and body stitch counts stay the same; the finished shark simply grows. Expect to roughly double your stuffing.
Colour and Customisation Ideas
The pattern specifies blue and white, which is the classic great white silhouette. But sharks come in more colours than that, and the construction supports changes easily.
- Grey body, white belly — closer to a realistic hammerhead look
- All white — ghost shark, subtle and oddly elegant
- Teal or mint body — popular for baby nursery gifts
- All black — intimidating in the best way; pair with white embroidered eyes
- The five fins are all the same pattern piece, so you can easily make them in a contrasting color if you want to break up the silhouette
Toy Safety
- This pattern uses safety eyes with locking washers. Safety eyes are not safe for children under 3 — the washer can come loose under sustained chewing or pulling. For any toy intended for a very young child, embroider the eyes instead using tightly knotted black yarn. Check all sewn attachments (fins especially) before giving the toy to a child, and inspect seams periodically with regular use.
- Use polyester fiberfill rated for toy use. Avoid repurposing loose pillow stuffing, which can clump and shift unpredictably inside a small toy body.
FAQ
Can I use regular acrylic yarn instead of plush yarn? Yes, the pattern works in any yarn weight — your finished size will just be different. Standard worsted gives a smaller, crisper result. The stitch counts stay the same either way.
Do all five fins really use the same pattern? They do. The fin instructions produce one size and shape, which works for dorsal, pectoral, and tail fins through placement and angle rather than a different construction. It keeps the fin-making phase fast.
I’ve never done a color change before — is this pattern still for me? The color change here is a basic carry-and-switch method, which is a good first experience with it. The belly section isn’t fussy about precision — a slightly irregular white edge actually looks fine on a shark.
My plush yarn is really hard to count stitches in. Any tips? Use a contrasting thread stitch marker through the fabric of the first stitch in each round, not just over the loop. Plush fibers grab the loop marker and can hide it. A physical thread marker stays visible.
Can I make this shark without the white belly? Completely. Skip the color change and work Rounds 21–28 entirely in blue with the same decrease rounds. You’ll lose the classic shark silhouette, but some makers prefer the solid look or want to use a color where a white belly doesn’t make sense.